Topaz Labs Plugins for Lightroom
I an not sure why I resisted trying out Topaz Lab Plugins for a long time. I suppose I did not want to at yet another step in my post processing workflow. I have heard photographers talk about them for years. Recently, I watched Topaz Labs give a demonstration of their Plugins on KelbyOne and it left quite an impression on me. While there are many reasons to use Topaz products I think for my own photography I would use them mainly for Wildlife Photography.
In this post I will go over the Plugins I use and the workflow of how I use them. There are 3 main plugins that I use so far:
Denoise —of all their products I have found the Denoise product exceptionally good. The good thing is that it not only reduces noise in your images but it will also sharpen the image.
My workflow to use this product is to use it on a Raw Image that is NOT PROCESSED.
The first step is to reset my Photograph in Lightroom so its a Flat Image where no post processing has been done. (you can reset the image by clicking the button on the bottom right corner). The reason a flatter image is better is that it helps Denoise remove the noise more effectively. Adding Sharpening, Clarity, Texture will add noise to the image.
Before sending to Denoise I perform the following steps (usually when sending to a plug-in its better to send the image over early in the workflow because when the image comes back as a TIFF or PSD you will lose some functions i..e, Camera Profiles
Do NOT CROP the photo!! You want to send a full resolution photo to Denoise so that Denoise works on an image with the largest amount of Pixels
I use Profile Adobe Color (you will not be able to change Profiles after the file comes back from Topaz)
Choose the proper White Balance because you will not be able to have all the WB options on the TIFF File
Lens Correction—click on Remove Chromatic Aberration and Enable Profile Corrections
Adjust Tones—-Decrease Highlights to around -75 and Increase Shadows to +90
You can also adjust Whites and Blacks if you want but can do this later.
Keep Texture, Clarity, Dehaze, Vibrant and Saturation at ZERO
Set Sharpening to ZERO (0) and Noise Reduction to ZERO but Color Noise Reduction I leave untouched at 25.
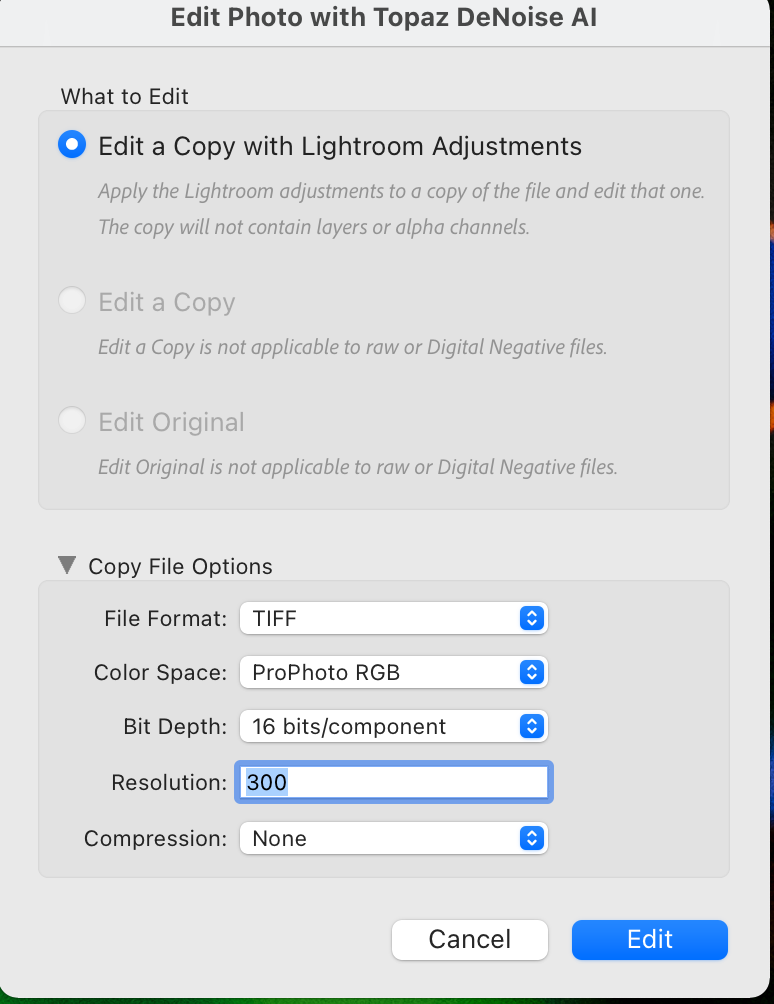
I am using the Lightroom Topaz Plugin. Now you can Right Click on the Image and Choose Edit in —Topaz Denoise. This will send the image to Topaz. You will see EDIT PHOTO WITH TOPAZ—use the same setting as below
Once you are in TOPAZ denoise the best thing is to Choose from the Top Part View—-COMPARISON VIEW—this will allow you to see the image in 4 different modes: Original, Denoise AI, AI Clear and Low Light. Denoise will choose the one it thinks is best (see how Denoise is in Blue) but you can choose the one you like best. On the Right Side Panel you can increase Remove Noise and Enhance Sharpness to the point you think the image looks right.
In the final step in the lower right corner it will say SAVE IMAGE and your photo goes back to Lightroom. Check how it works on the image below.

2. Gigapixel—the problem in Wildlife Photography is oftentimes you will need to crop your image. When you crop the photo you will begin to lose pixels. What Gigapixel does is it allows you to increase the pixels on a Cropped Photo so that you can make a larger Print. Basically it will take an image that is i.e, 6MB and transform it into a 24 MB Image while improving sharpness. It is AMAZING. I would apply Gigapixel AFTER using Denoise.
Before applying Gigapixel—make a Virtual Copy of your uncropped photo first.
Crop your Virtual Copy Image
Then send your image to Gigapixel —if you use 2x for example it should be large enough to now have an image that can be printed 20 x 30.
Simply Save Image and your photo goes back to Lightroom
3. Sharpen—the last Plugin I use is Sharpen. Which sharpens :). I do not use Sharpen with Denoise or Gigapixel since its already sharpening in Denoise or Gigapixel. I mainly use Sharpen when there is a Blur Problem with the photo or there is a problem with movement.
In the first image below the eyes are out of focus so I sent the image to SHARPEN by right clicking on the image and EDIT IN TOPAZ SHARPEN

The Image is Blurry
The image below has been SHARPENED—WOW!! Thats a game changer.

The Eyes are Now Sharp
I would HIGHLY recommend giving Topaz a try.