A Photography & Travel Guide to Bosque Del Apache, NM (Copy)
Bosque del Apache in New Mexico is an amazing place to visit.
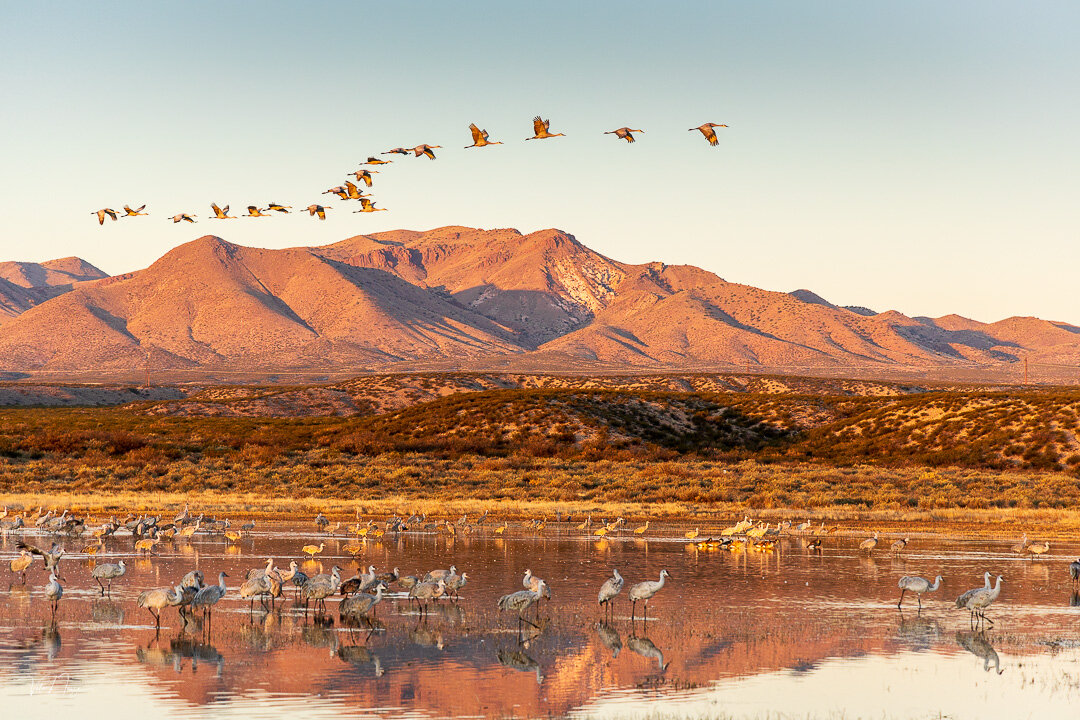
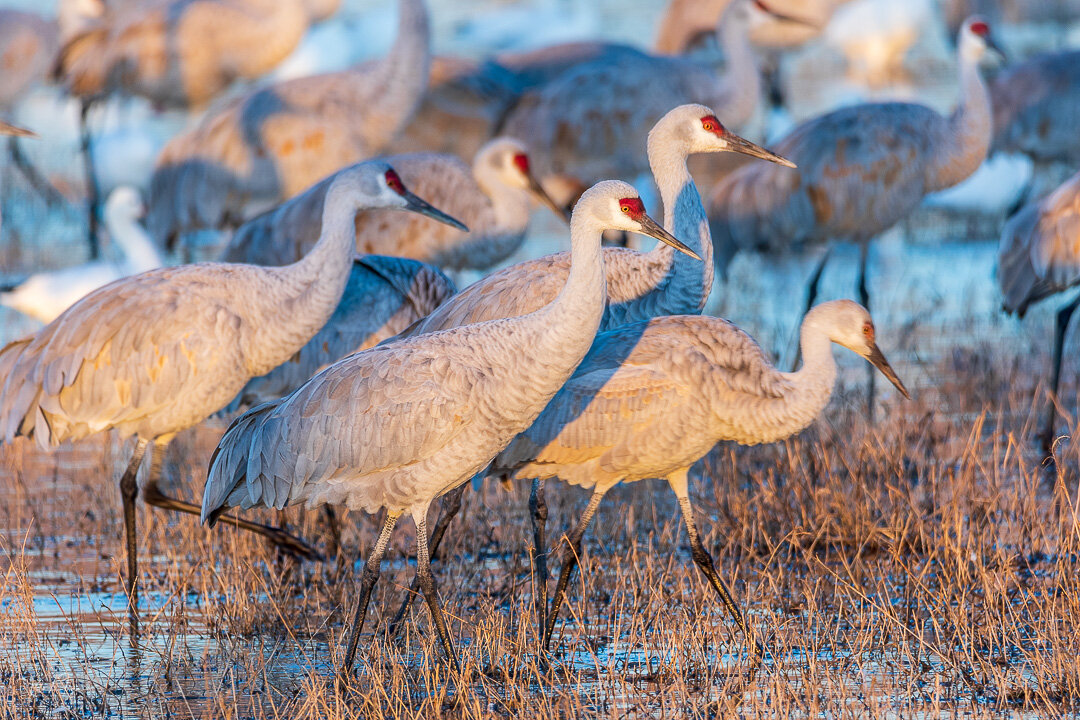
The Flight Deck at Sunrise
In this post I will share my experience and include photography, travel, and gear recommendations so that you can enjoy your trip to Bosque to the fullest. In November 2019, I participated in a workshop led by Scott Bourne, probably the best bird photographer in the world. Scott Bourne is an Olympus Visionary and award winning nature and wildlife photographer, who has had his photos featured in hundreds of publications all over the world. To learn more about Scott Bourne please take a look at his website https://picturemethods.com. Scott is a very friendly, personable, extremely interesting professional photographer that has lots of tips on bird photography, gear, travel and life. I really enjoyed spending time with him.
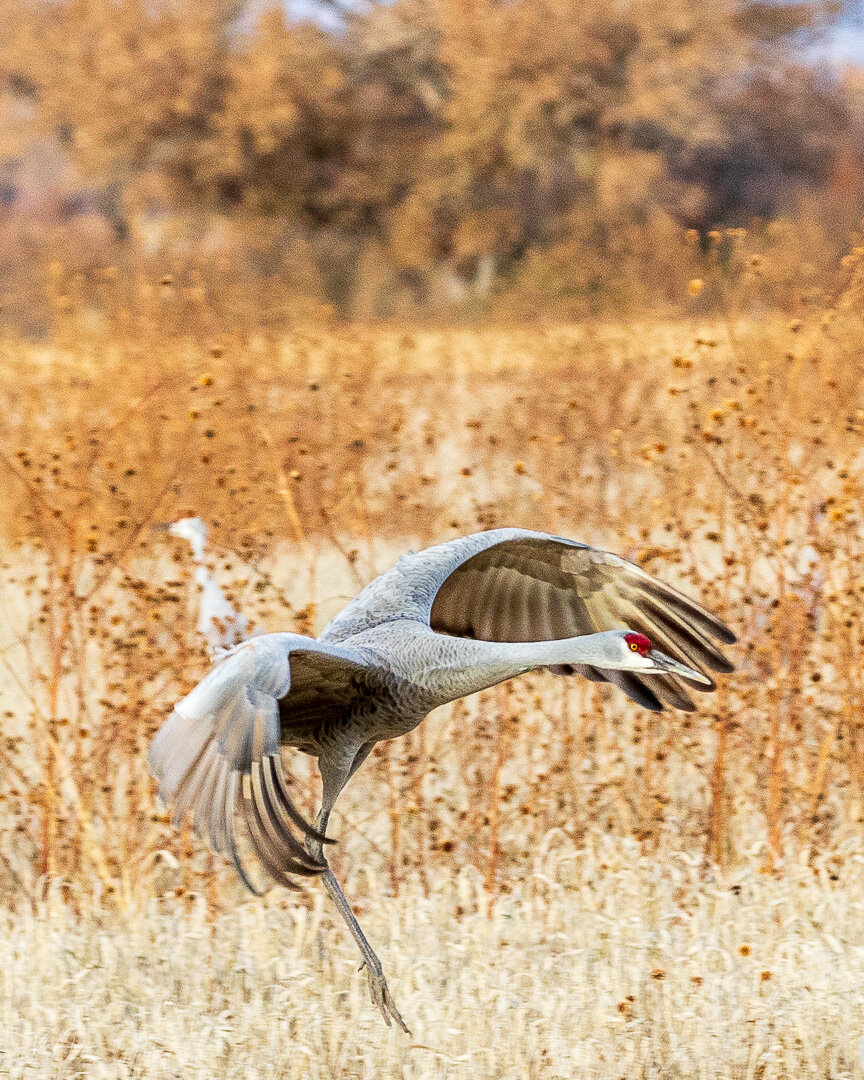
A Sandhill Crane Landing in the Corn Fields
Why Go to Bosque del Apache?
Bosque is a wonderful location for Landscape and Bird Photography. When we were there in November 2019 we saw 10s of thousands of birds. One of the more familiar birds you will see are the Sandhill cranes (Grus canadensis) that move among several areas throughout the day to feed, rest, and socialize. You will also see 100s of Photographers with plenty of 800 mm and 600 mm lens. But rest assured that you do not need these massive lens to take great photos. On your visit will be rewarded with gorgeous landscapes, beautiful sunrises and sunsets and of course tons of birds.

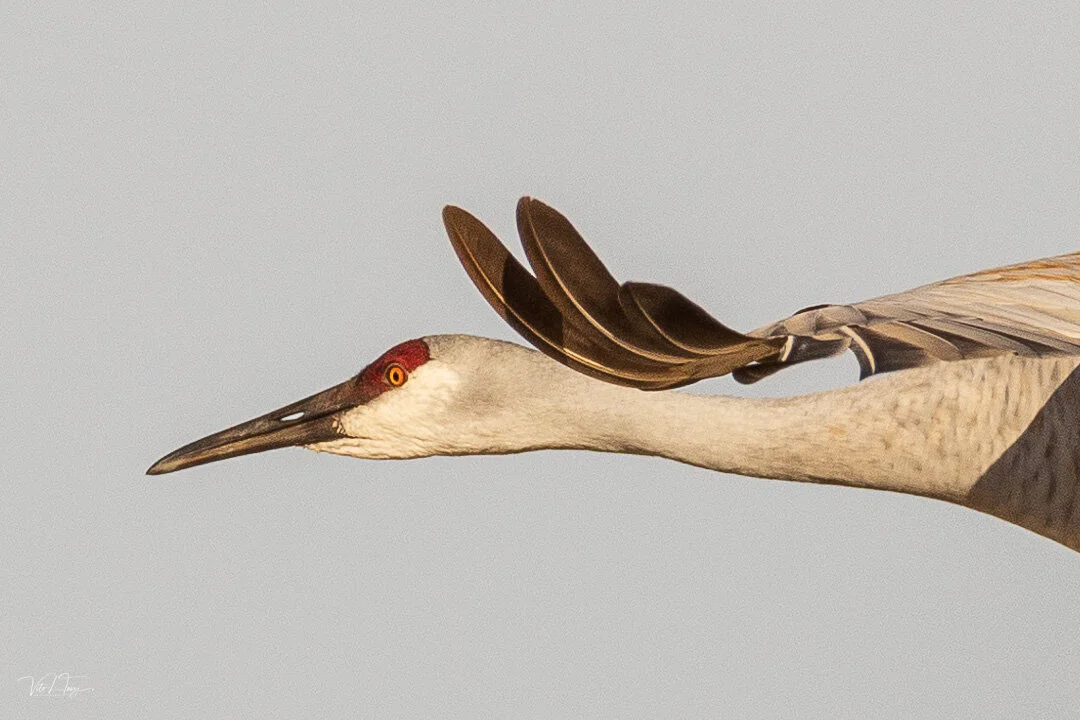
Sandhill Cranes in Flight
What is Bosque Del Apache?
Bosque is national wildlife refuge that is located about 1 hour south of Albuquerque, New Mexico. During fall migration, the 57,331-acre refuge is one of the spots where birds rest and refuel. The birds are flying south from Colorado and will continue further south for the winter. The first cranes and geese typically show up at the end of October and they continue coming until Thanksgiving. We also saw Mule Deer, Bob Cats and Coyotes. Here is a link where you can find more information on the refuge including visiting hours, entrance fees, events, permits etc. Here is a link to the Festival of Cranes in celebration of the return of the sandhill cranes to their winter home. The entrance fee per vehicle is just $5 per day. I would recommend staying at least 3 days so that you can make sure to enjoy one of the incredible New Mexico sunrises or sunsets.

Morning Blast Off


Where is Bosque Del Apache?
Fortunately, Bosque is very easy to reach. It is located at Exit 139, about 12 miles south of Socorro, New Mexico on Highway 25. It will take you about 20 minutes to reach from Socorro. Most visitors will stay in Socorro during their stay. The only place where parking can be an issue is at the Crane Pool which is not located inside the refuge. There are about 50 parking spaces available but since we left each day at 5:30 am we always found space. Once you are in the reserve there is plenty of space so parking is not an issue. There are also 3 bathrooms spread out through the refuge. The visitor center just before the entrance has the best bathrooms, a gift shop and an interest information center that provides more information on the bird migration.

Mornings at the Crane Pond
Where to Stay
We stayed at the Holiday Inn Express in Socorro. (1040 North California Street , Socorro, New Mexico 87801). The Holiday Inn Express is located right off Exit 150 on Highway 25. It is located 77 miles from Albuquerque, New Mexico. The hotel is perfect. It is very very clean, modern, has good bathrooms, a comfortable bed, an indoor pool and gym, includes a nice breakfast, and plenty of parking. Photographers will really appreciate all the electrical outlets in each room as well. I would highly recommend the hotel.

Where To Eat
Breakfast Options
Sofia's Kitchen & Burrito Tyme -Address: 105 Bullock St, Socorro, NM 87801-Phone: (575) 835-0022. The Pancakes and omelettes are great. The Breakfast Burritos are spicy but also very good.
M Mountain Coffee: Address: 110 W Manzanares St, Socorro, NM 87801—Phone: (575) 838-0809—is an excellent coffee shop for breakfast or anytime during the day. They have “real” Italian coffee.

Lunch and Dinner Options
Yo Mama’s Grill—Address: 913 N California St, Socorro, NM 87801 Phone: (575) 838-3962—we had dinner here twice and the food and service were good. The have salads, sandwiches, burgers, soups etc. It is not expensive but the portions are generous.
Bodega Burger Co & Lounge: 606 N. California Street Socorro NM 87801—Tel (575)838-2087. This was the best restaurant we tried in Socorro. Not only do they have great drinks, tapas, salads, sandwiches, burgers, steaks, chicken, and fish but they also play music in the evening.
Socorro Springs Restaurant: 1012 N California St, Socorro, NM 87801 —Phone: (575) 838-0650—this was our least favorite restaurant but it is located right next to the Holiday Inn Express. They have pizzas, beers, salads, etc.
SANDHILL CRANES
Day Trips from Socorro
Very Large Array: The Karl G. Jansky Very Large Array is a radio astronomy observatory located in central New Mexico on the Plains of San Agustin, between the towns of Magdalena and Datil, ~about 50 miles west of Socorro. The Coordinates are 34 04'43.497N, 107 37'05.819W . It is a very cool site to visit and learn more about Astronomy. It’s located about 45 minutes from Socorro and it does not take long to take the tour of the Observatory. But it’s well worth it.
Pie Town, New Mexico: Yes it is really called Pie Town. Located about 45 minutes beyond the Very Large Array. It is worth the drive? YES YES YES. We stopped at Pie-o-neer. Pie-O-Neer Pies: U.S. Pieway 60, Pie Town, NM 87827 Telephone: (575) 772-2711. We tried the Apple Pie and the Pecan Sweet Potato Pie and they were amazing.

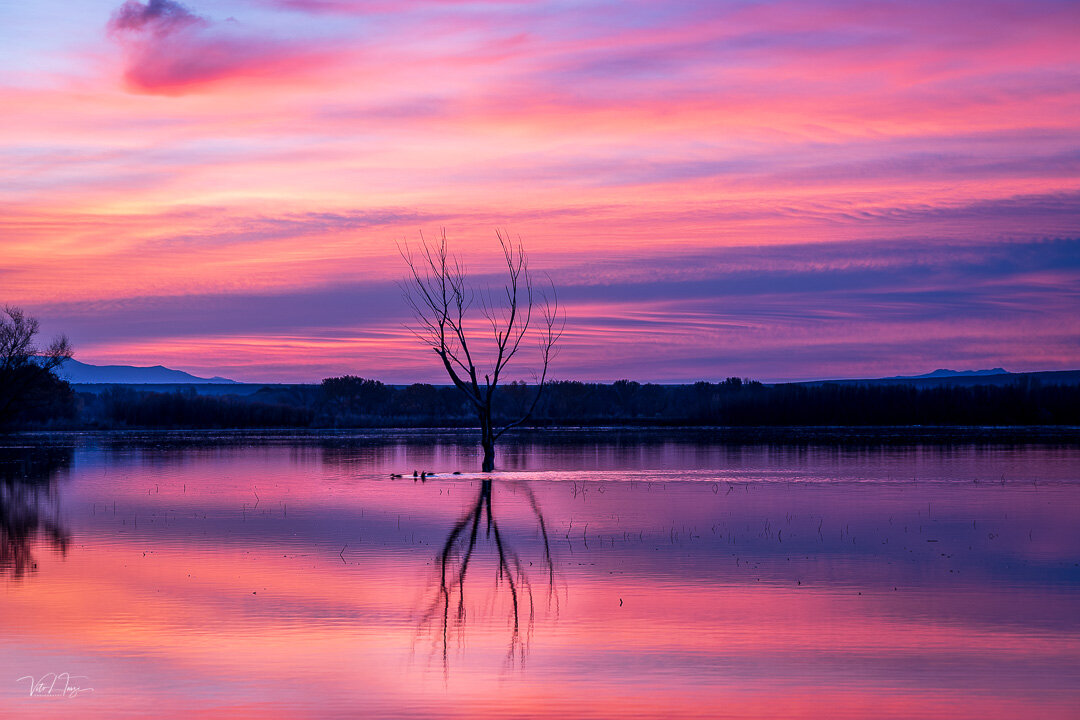
SUNSET

A “Bird Fight”
Photography Gear
Cameras-you will need a camera is well suited for fast-action & wildlife photography which is basically every DSLR or Mirrorless camera made in the past few years (i.e, Canon 5D Mark 4, Nikon 850s, Olympus etc). I would recommend a camera that can handle at least 1/2000 of a second shutter speed with 6 to 9 fps (frames per second) and a big enough camera buffer to be able to handle large bursts, if you want to get the best results, plus a good autofocus system for quick focus acquisition. I ended up shooting 7,000 photos in 4 days so you definitely need large SDs. Any modern digital camera (whether DSLR or mirrorless) should be capable of shooting at 1/2000 of a second and faster. I brought 2 bodies—my Canon EOS R and my Canon 7D Mark II. The Canon EOS R worked better in low light situations at sunrise and sunset and I thought the 5 Frames Per Second worked quite well. The 7D did not handle low light situations as well but with 10 Frames a second it was very fast.
Lens: the faster lens will be your best friend at Bosque. If you have glass that goes down to f2.8 it’s perfect. However, you can definitely get excellent shots at f4 or f5.6. If you are going light you only need 2 lens one that shoots wide (a 16-35mm or 24-105mm) and telephoto that goes to at least 300 mm something like a Canon 100-400mm. Of course the longer the better. Most people would recommend you going to at least 600 mm (a Sigma or Tamron 150-600mm for example).
So what did I bring?
14mm Prime: I brought a Canon 14mm Prime f2.8 lens. This lens is optional but it was great to get the landscapes or “birdscapes” photos in the early morning.
24-105 mm: The second lens I brought was my Canon RF 24-105. This is a very versatile lens that is wide enough for Bosque. It will also allow you to zoom in on birds that are close to you.
70-200 mm: I also brought a medium telephoto Canon EF 70-200mm f 2.8 lens. The advantage of this lens is that beyond being super sharp it is also very fast. I used the lens more than I would have thought. A lot of the time the birds are very close (within 3-5 yards) so this lens was perfect.
Tamron 150-600 VC G2—-I purchased this lens for the trip. I loved the longer focal length but had some issues with focusing at first. It took a bit of learning to be able to use the lens properly. With practice I was able to get sharp images. When I used the lens on my Canon 7D Mark II the focal length was 960 mm. The lens is not super fast so I used it more in stronger light.
In the end I would probably only take 2 lens a wide angel lens like the (24-105mm and a 100-400 mm with a 1.4 Teleconverter)
Converters—a lot of photographers will use a 1.4x TC (TeleConverter). The only issue is that you will lose at least a stop of light. So I only used my 1.4x when it was quite bright.
Tripods & Gimbals—I brought my RRS Travel Tripod with a BH-40 Ballhead and a Promaster GH-30 Gimbal. A tripod is essential because in the low light you will need stability. Plus the long lenses are heavy. I usually would keep my Canon EOS R on a camera strap with a 24-105 mm lens and my 150-600 mm on the tripod. I also found the Gimbal to be very helpful as it allows you to move with the birds. If you want sharp shots you will need to bring either a Tripod or Gimbal.
Using Flash: while having fill flash may be helpful especially to photograph birds I did not use it and neither did Scott Bourne.
Shutter speed – You will need the shutter speed to be fast enough to “freeze” the bird’s wings in your photo. So how fast should you set your shutter speed to freeze the wing motion? You will need to be at least 1/1000th of a second to 1/2000th of a second to freeze the bird. For birds in flight and fast-action scenes, use even faster shutter speeds. For birds that are just sitting in the crane ponds or not being active, you can use slower shutter speeds of 1/250-1/800 and lower ISO for better image quality.
Aperture – In order to gain as much depth of field as possible, you want to use the smallest aperture possible. For “birds-capes” I shot at f 2.8 and for birds in flight I was closer to f5.6 so that I could keep the shutter speed over 1/500 or 1/1000th of a second.
ISO – You want to keep your ISO setting as low as possible to avoid digital noise (graininess) in your photos. My ISO would range from 320 to about 800. Occasionally my ISO went up to 1250 but this was necessary to keep my shutter speed fast enough.
Focusing: To keep birds in focus, set your camera’s focusing mode to continuous focus. In this mode, as long as you have the shutter button depressed halfway and are focused on the bird, the camera will continuously focus with the movement of the bird. Canon calls this function “Al Servo”, while Nikon calls it “Continuous Servo” or AF-C. Always focus on the nearest (to the viewer) eye of the bird. It is acceptable to have a blurred tail or other parts of the bird, but at least one eye always needs to be in focus and sharp. For birds in flight, focus on the bird’s head or chest – whichever provides better contrast for the camera autofocus system. You will end up taking lots of out of focus photos but that’s ok as long as you get a few good ones.
Composition: All the rules of composition applying to any photo remain valid here. You always want to have more space in front of the bird than behind; a good rule is to have a least two to three times the space in front of the bird.
Histogram: I never realized how important it is to keep an eye on the histogram until I started trying to shoot birds. For bird photography you want to shoot to the right. You want the histogram to almost touch the right side of the histogram. I had a lot of shots where the histogram was touching the left side and these photos were not well exposed.
Shoot lots of images: I typically shoot a single image first, then take a look and make sure that the images are sharp and in focus. If everything looks good, I will shoot the bird in bursts of 5-10 frames at a time. Having a fast camera that can handle 5-6+ frames per second is very helpful. I then go through hundreds or sometimes even thousands of pictures at home and delete the images that I do not want (which is probably 80%). Just to give you an example—I shot nearly 8,000 photos—3,000 were deleted (out of focus or missed shots)—-from the 5,000 I Picked 800 or (10%) and kept about 200 photos.
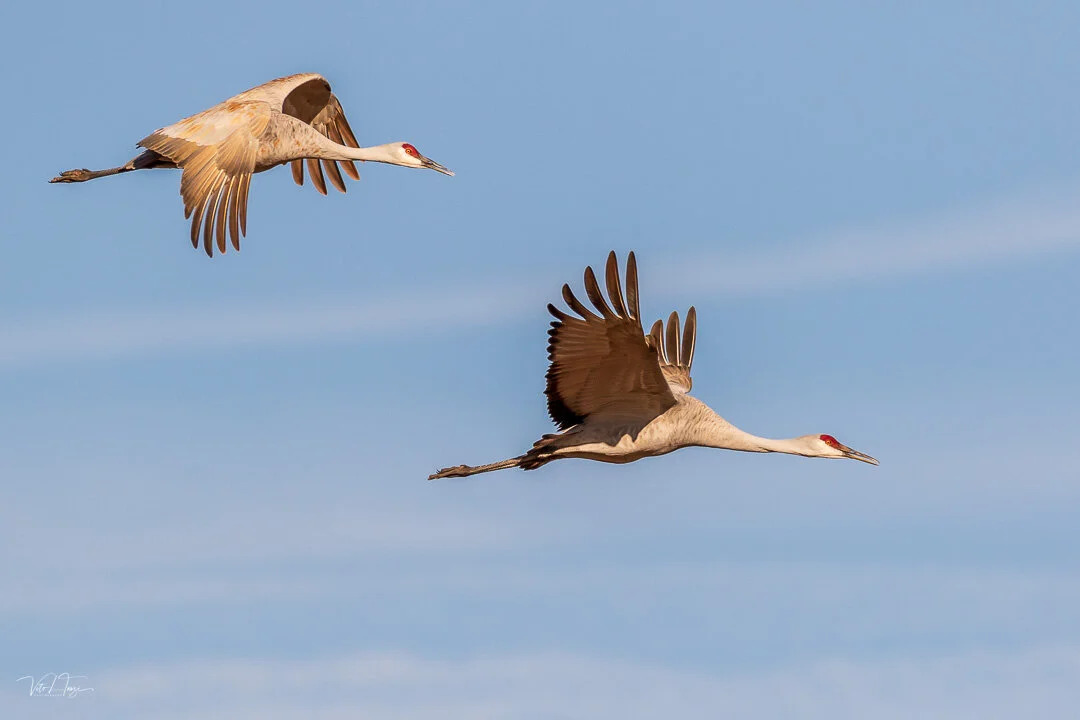
In flight
Photography Tips—Crane Pond
Light & Chasing Light— waiting for the right light is particularly important in Bird Photography. Good lighting plays a critical role in successful birds-in-flight photography. As with any other kind of outdoor photography, the golden hour light in the morning and evening are best. You need to chase the light! In order to get the best dynamic range of colors the bird(s) need to be well lit. Direct sunlight also brings out feather details. Much of nature photography is about waiting for the right light, and this is particularly true with birds.
Sun Angle—one of the most important things I learned from Scott Bourne is the importance of always being on sun angle. For bird photographers, there are three possibilities; the light can be from in front of us and behind the bird thus backlighting the bird, the light can come from one of the sides of the bird giving us side-lighting, and the light can come from behind us and thus lighting up the bird without shadows. However, according to Scott Bourne the only way to shoot birds is on sun angle. What this means is that you need to look at where your shadow is pointing and that’s the angle you shoot at. And you only can shoot no more than 5 Degrees right or left of your shadow. Some photographers mention that you can shoot 20 degrees to the left and right of your shadow. However, I will stick with Scott’s recommendation and only shoot at 5 degrees. So you have to be very mindful of where you are pointing your camera at all times. You will also need to change direction as the angle of the sun changes.
Background: is also very important in Bird Photography. It’s often the background that turns an average bird photo into a work of art. Look for details that might interfere with clean edges for your bird—for instance, a branch that could later look like it’s coming out of the bird’s head will ruin the photo. Some of the best photos are those with the sun, corn fields in the background. So choose your backgrounds carefully. Pictures with objects behind the bird are not as pleasant as pictures with a smooth background.

Clothing and Gear

Incredible Sunrises in New Mexico
During our 4 days in Bosque del Apache we experienced a wide range of temperatures. In the morning it was very cold but by mid-day temperatures really warmed up. So the best thing is to have multiple layers of clothing.
Base Layers—each day I would wear a Top & Bottom Midlayer. You want to make sure it is Merino wool that wicks away moisture. Definitely don’t wear cotton. I personally love the brand Icebreaker but there are tons of other good brands like REI, Patagonia, Arcteryx etc.
Socks and Footwear—you will also need warm socks (perhaps 2 pairs at the same time if your feet get cold) and warm shoes. On the first day I used standard hiking shoes and found that my feet were cold early in the morning. So after learning my lesson I would wear a pair of waterproof boots. I was very happy with my Bogs and my wife loved her Muckboots.
Pants—you will want to wear a pair of hiking pants that are no only warm but wind-proof. There are many brands to choose from. I would not wear Jeans they will not be warm enough.
Fleece—I brought 2 fleeces that I would wear over my Base Layer. Again there are many good brands from REI, Patagonia, North Face etc. I used Arcteryx and was very happy and warm.
A Mid-weight Down Jacket—Over the fleece I would wear a mid-weight Down Jacket in the morning and evening. During the early afternoon I would remove the down jacket.
A Rain & Wind Proof Shell—I also brought a Shell Jacket just in case it was windy or rainy. I never used it.
Gloves and Hats—finally you will need a warm wool cap in the morning especially. I also used a pair of warm gloves each morning. Of course a pair of “photographer friendly” gloves that allow your index and thumb tip to come off so you can manipulate your camera is very helpful.

Conclusion
I highly recommend a trip to Bosque Del Apache. It’s easy to reach and not an expensive trip. The landscapes and birds are amazing. It’s really a blessing to see such beautiful things. In the end you will take tons of photos and hopefully get a few gems that you should print.